A menu can look perfect on your laptop and still come back from the printer wrong — text shaved off at the edge, a header photo gone soft and pixelated, colors a shade duller than they looked on screen. Almost none of that is the printer’s fault. It traces back to how the file was built. Setting up a menu correctly is a short, repeatable checklist, and getting it right the first time is the difference between a three-day turnaround and a reprint. Here is how to prepare a menu file that prints the way you designed it.
Start with the finished size, then add bleed
Decide the trim size first, because everything else scales from it. The most common full-service format is 8.5 by 11 inches. A compact bistro menu or booklet is often 5.5 by 8.5 inches, wine and cocktail lists frequently run around 4.25 by 11 inches, and a table tent is typically 4 by 6 inches. Larger single sheets go to tabloid at 11 by 17 inches, which folds down to a four-page 8.5 by 11. Folded formats have their own math: a tri-fold built on a letter sheet gives you three panels of roughly 3.67 inches each, and the panel that tucks inside is usually cut a hair narrower so it folds cleanly, which is worth confirming with your printer before you design to the millimeter.
Once the trim size is set, add bleed. Bleed is extra artwork that extends past the cut line so that when the guillotine trims the stack, no sliver of white paper shows at the edge. The standard is 0.125 inch, about 3 mm, on all four sides. That turns an 8.5 by 11 menu into an 8.75 by 11.25 inch document. Just as important is the safe margin on the inside: keep text, prices, and logos at least 0.125 to 0.25 inch in from the trim so nothing critical lands near the blade. Commercial trimming carries a small tolerance — a fraction of a millimeter of drift across a tall stack is normal — and the safe margin is what absorbs it.
Get the resolution right, or the photos will soften
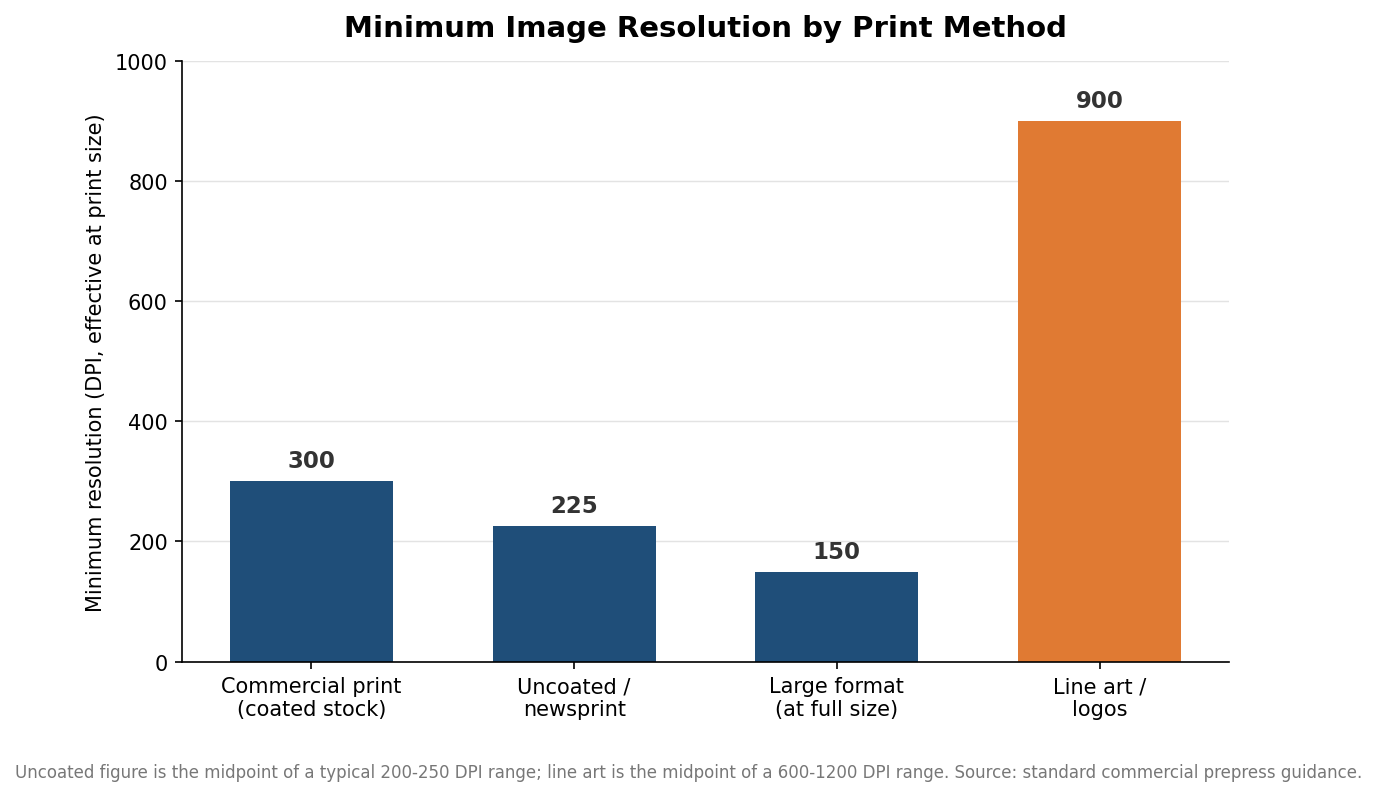
Resolution is measured at the actual printed size, not at whatever the image happens to be on screen. The working standard for commercial print on coated stock is 300 DPI. Uncoated and newsprint-style stocks hide a little softness and can drop to roughly 200 to 250 DPI, large-format pieces viewed from a distance can run near 150 DPI at full size, and crisp line art or a vector logo wants far more, in the range of 600 to 1200 DPI, because hard edges reveal every jagged step. Whenever a logo is available as vector art rather than a photo, use the vector version; it stays sharp at any size.
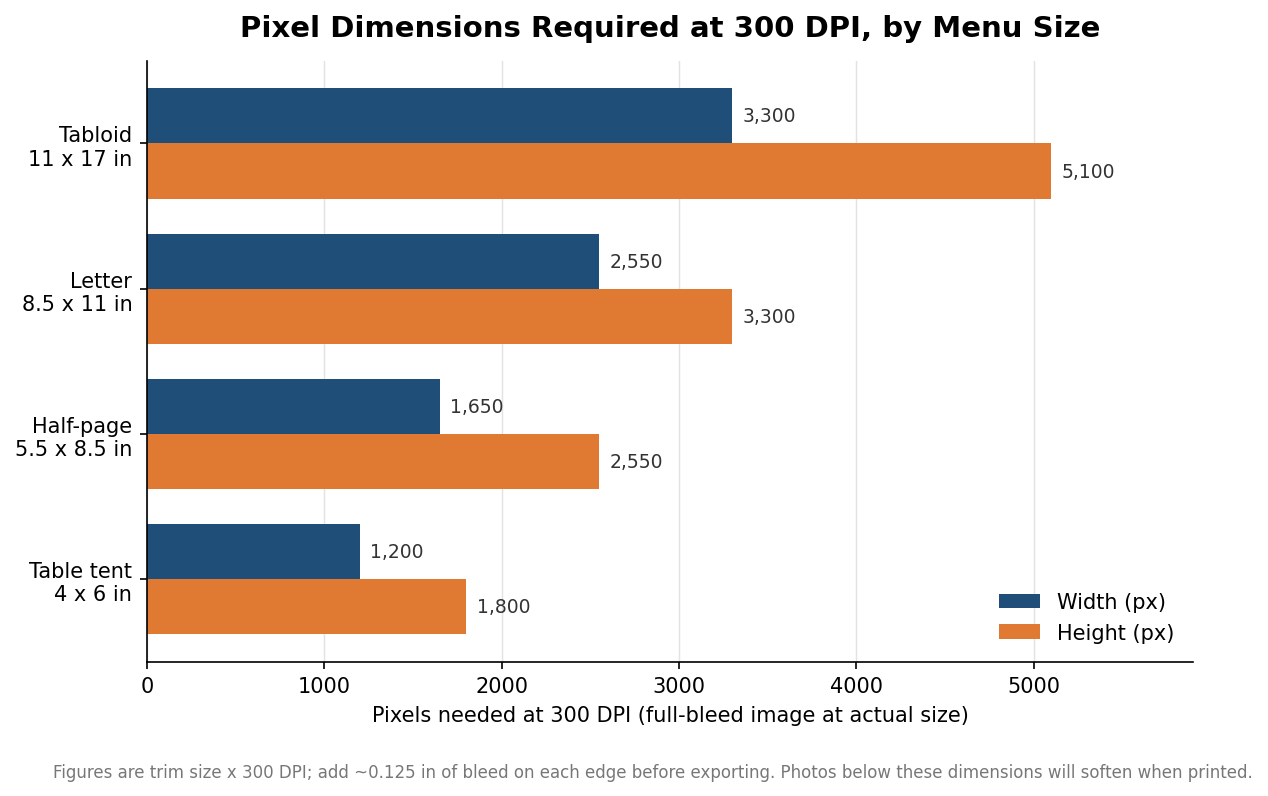
The practical version of this rule is a pixel count. Multiply the printed dimension in inches by 300 and you have the minimum pixel size a photo needs. A full-bleed image across an 8.5 by 11 menu needs roughly 2,550 by 3,300 pixels; a 4 by 6 table tent needs about 1,200 by 1,800. If the photo a supplier sent is smaller than that, it will look fine on a phone and mushy on paper. Enlarging a small image does not add detail — it only stretches what is already there, so the fix is a bigger original, not a bigger export.
Design in CMYK so the color you approve is the color you get
Screens build color from red, green, and blue light; presses build it from cyan, magenta, yellow, and black ink. Those are different color spaces, and their ranges do not fully overlap. If you design in RGB and hand off an RGB file, the press has to convert it, and bright blues and vivid greens in particular tend to come back duller or shifted. Set the document to CMYK from the start so you are looking at print color while you design, not screen color you will lose later. For the solid black backgrounds common on menus, ask your printer whether they want a rich black build rather than plain 100% K, which can look thin and gray over a large area. Finish changes the picture too: a gloss or UV coating deepens color and contrast, while matte and soft-touch laminations mute it slightly, so a proof on the actual stock and finish tells you far more than a proof on plain paper.
Lock the fonts, export the right file, and proof before the run
Two things break more menu files than anything else: missing fonts and the wrong export. Fonts should either be converted to outlines or fully embedded in the exported file, so the printer’s system does not substitute a different typeface and reflow your prices. For delivery, a press-quality PDF is the standard, and a PDF/X-1a or PDF/X-4 preset builds in the bleed, color handling, and font embedding automatically. Avoid sending a JPEG or PNG as the final file; those are screen formats and often arrive in RGB.
Then read the proof carefully. Check spelling on every price and dish name, confirm the bleed runs to all four edges, and verify nothing important sits inside the safe margin. Most shops quote a lead time of about three to four business days after you approve the proof, so an error caught at proofing costs you minutes, while the same error caught after printing costs the whole run and another turnaround. Menus also change constantly with seasonal items and price updates, so build the file in clean, editable layers and keep the native file, not just the flattened PDF, for the next revision.
A quick pre-flight pass
Before you send anything, run one last check in plain terms: the document is built at trim size plus 0.125 inch of bleed on every edge; text and prices sit at least 0.125 inch inside the trim; every photo clears 300 DPI at its printed size; the file is CMYK; fonts are outlined or embedded; and you are exporting a press-ready PDF. Indicative menu pricing runs anywhere from well under a dollar per sheet at higher quantities to several dollars for premium stocks and finishes, but that math only works in your favor if the file prints right the first time. Five minutes of setup protects the whole order.